iThemes Security Installation and Configuration – WordPress
WordPress security has become more of a hot topic in the last few years as many vulnerabilities have been discovered and, unfortunately, exploited. So, we are here today to present our favorite WordPress security plugin, iThemes Security, and show you how to set it up and configure all the recommended settings.
While most of these security vulnerabilities have been quickly patched by the WordPress team and plugin/theme developers, many users have neglected to update their WordPress website, or maybe just didn’t get to doing so before the hole was sniffed out by malicious parties and exploited. This has no doubt left thousands, probably millions of sites hacked, and the cleanup isn’t pretty.
While the best defence is keeping the WordPress core, plugins, and themes up to date, there are additional steps that you can easily take to lock down your WordPress website’s security and drastically reduce chances of being hacked.
There are a few plugins out there that perform similar sets of actions, but we prefer iThemes Security (website), formerly Better WP Security. It provides many features, most of which I have detailed over on our Best Must-Have WordPress Plugins blog post. We have not had a single problem with any security issues on websites running iThemes Security, and that is quite a few sites.
While that post provides a good general overview of what we think is the best WordPress security plugin, this post is meant to provide the details of setup and configuration. This may seem daunting, but I assure you it is quite simple. There are some advanced areas, but in general those are optional.
Installing and Configuring iThemes Security on a WordPress Website
First, you’ll need to choose which version you need.
The basic, free version will suite most needs. It has the following features:
- One-click “Secure Site” WordPress security check
- Ban bad users
- Block specific IP addresses and user agents from accessing the site
- 404 Detection
- Hide Login & Admin URL
- Change WordPress salts & keys
- Away Mode
- Database Backups
- File Change Detection
- Remove Windows Live Write header information
- Remove RSD header info
- Remove update notifications from specific user roles
- Remove login error messages
- Rename ‘admin’ account
- Change ID on user with ID 1
- Change WordPress database table prefix
- Change wp-content path
- Force SSL for any post, page, or admin page
- Turn off file editing in WordPress admin
- Reduce Comment Spam
- Local brute force protection
- Network brute force protection
- XML-RPC brute force protection
- Security logs
- Email Notifications & Digest Emails
- Customizable lockout messages
- Strong Password Enforcement
- File Permission Check
- iThemes Sync Integration
- Malware Scan
If you are interested the below features, you’ll want to check out the Pro version (affiliate link).
- Dashboard Widget
- Google reCAPTCHA Integration
- Two-Factor Authentication
- Settings Import & Export
- WordPress Core Online File Comparison
- Scheduled Malware Scanning
- User Action Logging
- Temporary Privilege Escalation
- WP-CLI Integration
- Password Expiration
- Private Ticketed Support
- NEW! WordPress User Security Check
Go Pro (affiliate link)
Next, install and activate it.
You have probably installed plugins on your WordPress website before, but if you haven’t, to install the free version you can either download it from the below link and upload it via the WordPress admin (or FTP), or you can go to the Plugins section of the admin, “Add New,” search for “iThemes Security” and install/activate it.
If you purchased the pro version, you will have to download it from the iThemes website and install it via the WordPress admin or FTP.
Configuring iThemes Security
Once you have installed and activated iThemes Security, you can begin the configuration.
In this post, I will go through our standard and most common configuration we use for client websites, then explain some of the optional and advanced settings. If you have a specific question, try using CTRL+F to search in your browser for words on the page to locate your answer. Otherwise, happy reading!
Basic / Standard iThemes Security Configuratio
1. Security Check
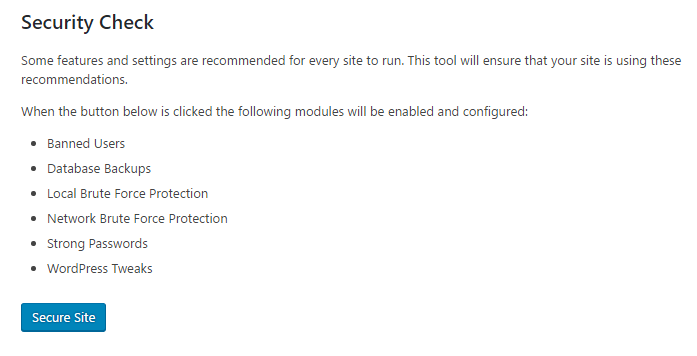
Log in to your Wordpress Admin and click on “Security” on the left hand admin navigation. That may pop up the “security check,” or it may bring you to the list of options. If it doesn’t bring up the “security check” screen by default, locate the tile in the top left column/row and click on “Configure Settings”
Click “Secure Site”.
This will enable several recommended security settings, and it may ask you if you want to activate network brute force protection. If it does, enter your email address, choose whether to receive email updates or not, and click the activate button.
Click close.
2. Global Settings
Locate the “Global Settings” tile to the right of the Security Check tile and click the configure settings button.
The default settings on this page are mostly to be left alone. This is where you can change notification details, lockout thresholds, and a few other things.
One thing to note is that if you are on a popular shared host like Godaddy, etc, you may start getting a lot of lockout notification emails. If that become a nuisance, you can come back in here and select “Send digest email,” so you will only get one email a day full of notifications.
Scroll down this page until you get to “Lockout White List.” Click “Add my current IP to the White list” to make sure you don’t lock yourself out of the site while you are configuring iThemes Security, then click the “Save Settings” button in the bottom left.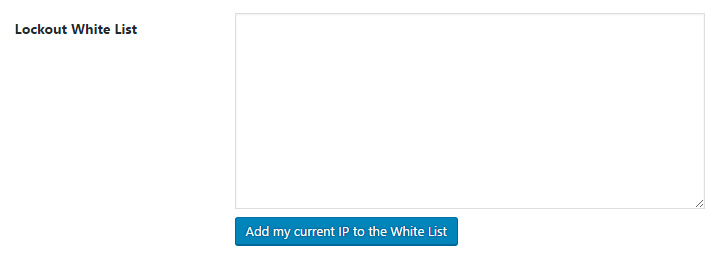
3. Banned Users
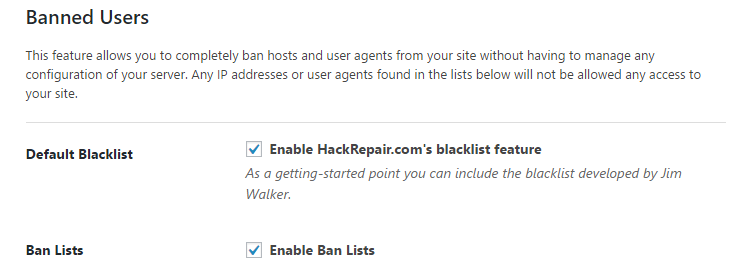
Locate the “Banned Users” tile and click “Configure Settings”.
Click “Enable HackRepair.com’s blacklist feature” and save the settings. That way your site is already going to ban hosts that are on that honeypot list.
4. Local Brute Force Protection
In this tile, the only setting you should need to update is the very last one, “Automatically ban ‘admin’ user.” Only select this option if you do NOT have a user in your WordPress with the login “admin.”
If you do have an “admin” user, please create a new user using either a screen name, nickname, or something like the first letter of your first name followed by your last name. Do not use the website’s domain name, or any common terms. Delete the admin user, attributing all website assets from the admin user to this new user during the process (as prompted). Then, return to this section, click the “Automatically ban ‘admin’ user” box, and save your settings.
If you are using a web host that backs up your database automatically and routinely, disable this feature. This will save unnecessary resource, storage, and bandwidth usage.
If your host does not automatically and routinely back up your website’s database, or if you aren’t sure, click configure settings and go into the settings page.
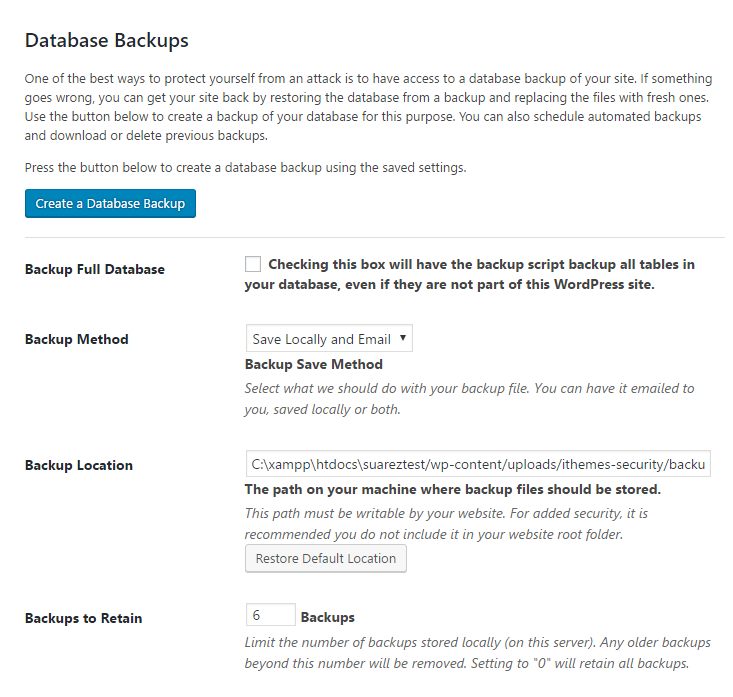 Once there, make the following adjustments:
- Choose what makes sense regarding the backup method. You can either have database backups emailed to you, stored on the server, or both. Keep in mind that if you have a large website, the database may not fit in an email. On most sites, we choose both.
- Choose how many backups you would like to retain. We typically set this to 6 or so.
- Scroll down to the bottom and check the box for “Schedule Database Backups”.
- Set the Backup Interval field that becomes visible to 7 days or so (lower if you are making major changes to the site more frequently). Combined with the previous setting, that gives you 6 weeks of rolling backups, just in case something goes wrong and you need to revert to a few weeks prior.
Save your settings.
6. System Tweaks
You could consider this optional, but it is part of our standard configuration. Note! Sometimes these settings can cause issues. If you experience any strange issues with your site after changing these settings, go back in and remove them one by one until the symptoms are gone to track down the specific setting causing issues.
Click “Enable” if this is not already enabled, then go into the settings.
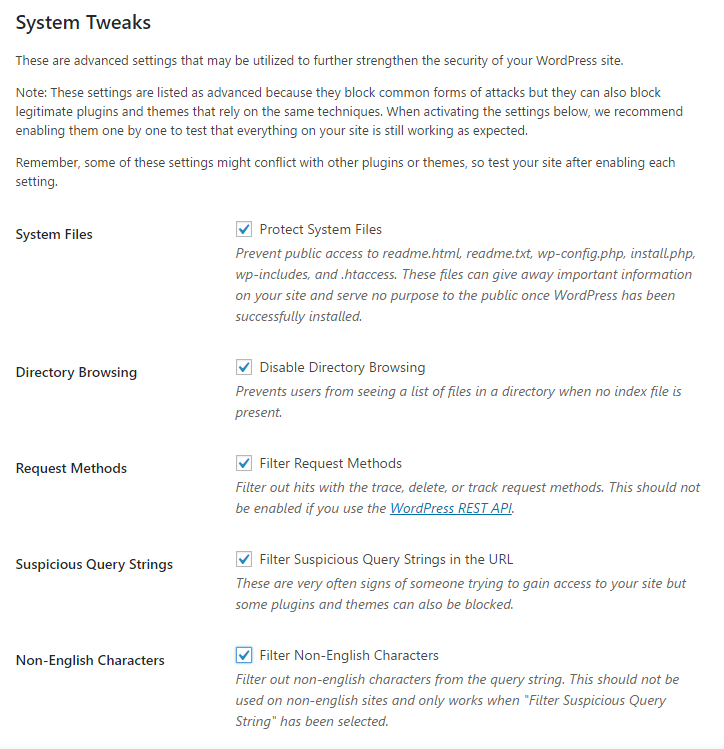 Check the following options, then save your settings.
- Protect System Files
- Disable Directory Browsing
- Filter Request Methods
- Filter Suspicious Query Strings in the URL
- Filter Non-English Characters
- Filter Long URL Strings
- Disable PHP in Uploads
Notice we didn’t check “Remove File Writing Permissions,” “Disable PHP in Plugins,” or “Disable PHP in Themes.”
7. WordPress Tweaks
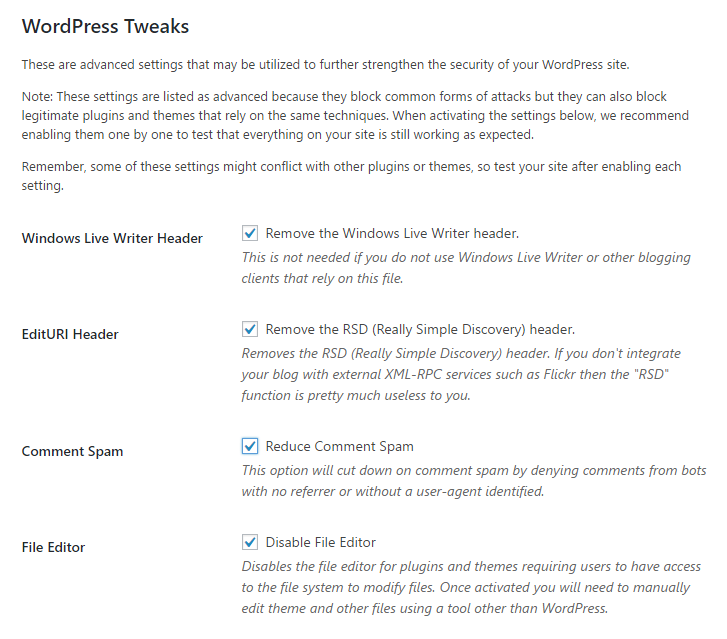
Again, these could be considered optional but are part of our standard configuration that should be safe on most sites. Also, again, if you experience issues after changing these settings, come back and remove them one by one to pinpoint which one is causing the issue.
- Remove the Windows Live Writer header
- Remove the RSD header
- Reduce Comment Spam
- (Leave Disable File Editor clicked)
Under “XML-RPC”, choose the best option that describes your site. In general, try to use the “Disable XML-RPC” option, but if you are using Jetpack, the WordPress mobile app, or pingbacks, you should not disable it.
Lastly, scroll down towards the bottom and click “Disable Extra User Archives,” then save your settings.
8. Hide Backend
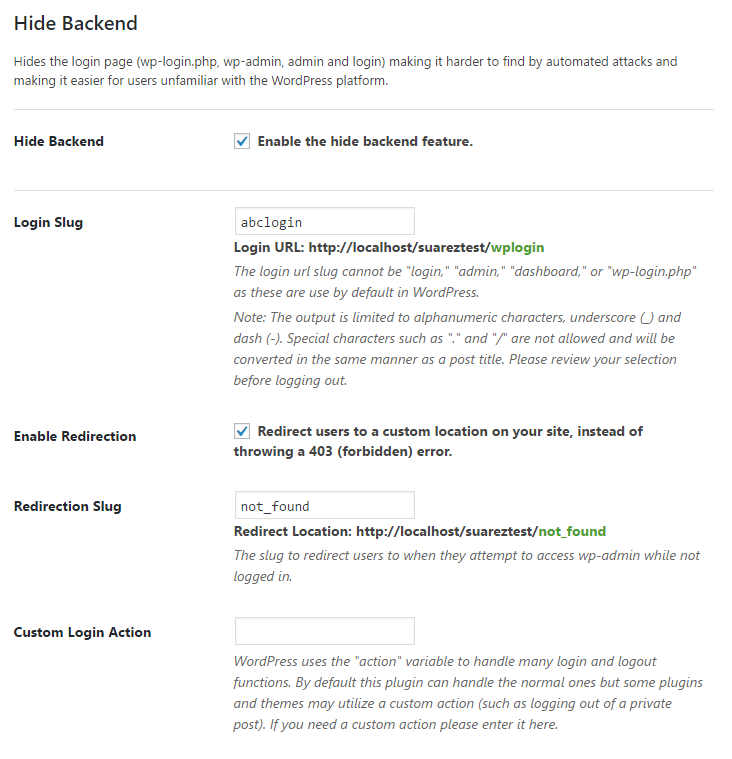
Hide backend in iThemes is an advanced feature, but something you should definitely enable and configure as a standard feature.
It allows you to change the admin login URL, which effectively hides it from bots and other malicious parties. This helps protect the site in general, but also drastically cuts down on the number of login attempts, which can tax the server and cause slowdowns.
It can be found in the “Advanced” section (see screenshot). It’s a link in the top right of all the settings/configuration tiles we’ve been working with thus far.
After you click advanced, the Hide Backend tile should be in the top left. Click the configure settings button for it.
Click “Enable the hide backend feature.”
Change the “Login Slug” to something not common that you can easily remember. This should not be the domain name of your website, a common username, etc. We typically abreviate the domain or company name, then add login, or something similar.
Save these settings, but make sure you remember what you used, because you will have to log in at that URL (instead of at /wp-admin or /wplogin) next time.
 Other Optional and Advanced iThemes Security Settings
The above covers everything you should configure for your standard site. There are some other a few other advanced and optional settings, though, which I will touch on below. Some of these have the potential to crash your site, so make sure to get a good database backup prior to enabling them! I’ll do my best to explain and point those out.
1. Admin User ID
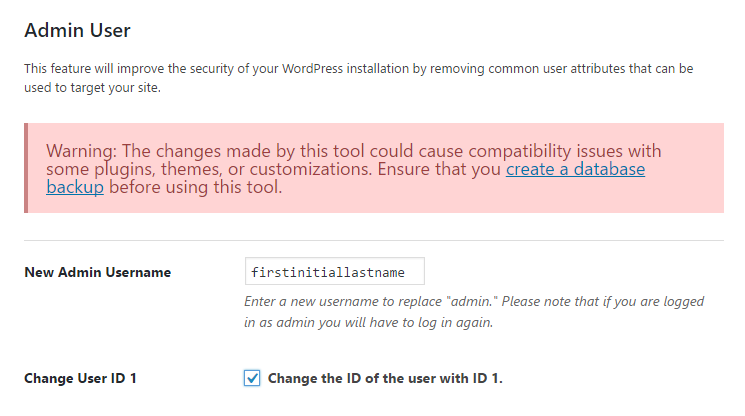
This setting allows you to change the admin username and user ID in the database. This is important because all malicious parties will try “admin” and assume it has the ID of 1 in the database. You should defnitely not have an “admin” user on your site, and changing that ID in the database is a good idea too. However, make sure to have a database backup first, as this database change could cause issues, specifically if your site is well established, with many users and a large database. On “fresh” sites, there is less potential for anything to go wrong.
The Admin User settings are under the advanced section of the iThemes settings.
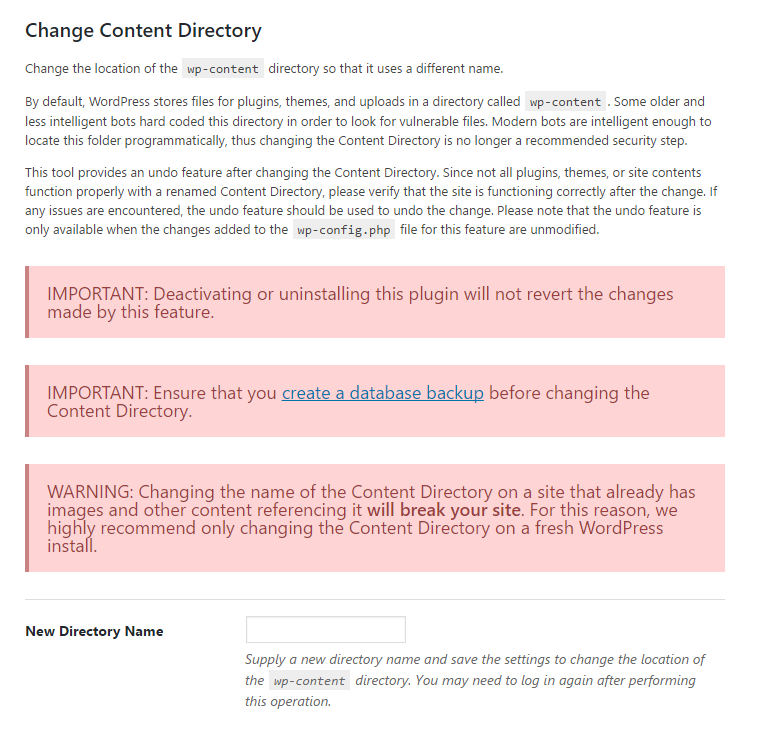
DO NOT PERFORM THIS TASK ON A WEBSITE THAT IS ALREADY ESTABLISHED. ONLY DO THIS ON A FRESH WORDPRESS INSTALL
If you do the above, it will break your site. You’ve been warned!
On a fresh website, though, making this change effectively hides potentially vulnerable files from bots and other malicious parties that won’t know where to look for them anymore by changing the “wp-content” directory to whatever you enter.
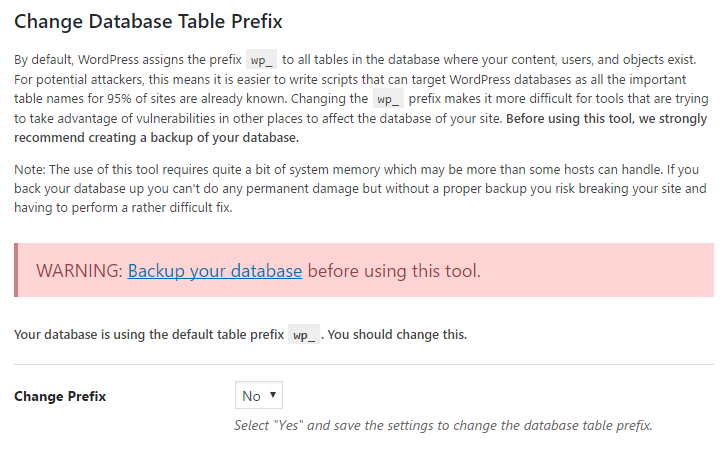
 3. Change Database Table Prefix
In your WordPress website’s database, there is a prefix to every database table that WordPress sets up by default to be “wp_”. This means that bots and malicious parties know what to look for and, if they gain access to your database, can easily browse and change your database with pre-set database queries.
This is another setting that is best done on fresh websites, but can be performed on established ones. Just make sure you have a database backup and know how to use it.
Also of note, many “one click WordPress install” hosts have begun to automatically randomize this. So, if you use such a service on a prominent host, you can check what the table prefix is by opening the iThemes settings page for this feature and checking near the bottom where it says “Your database is using…” If it says “wp_” you should change it below. If not, you can disregard this step.
4. 404 Detection
This feature can be good for blocking malicious bots that are just bombarding your site looking for common pages that they may be able to use to attempt to gain access. However, it can lock out regular users if there are a lot of broken resources, missing pages, etc that are linked to from other websites or internally. For that reason, we use it sparingly and for new websites mostly. A lot of website migration projects end up having many broken links and pages, and if we aren’t in charge of the content post-migration, we typically do not turn this on to safeguard legitimate users from getting locked out.
5. File Change Detection
If you are particularly paranoid that someone may get into your system, you can set this up. It will notify you if files on your system change. If you do set this up, make sure to tell it to ignore things like cache folders, etc, that change frequently. Otherwise the notifications will become annoying.
6. Away Mode
If you ever need to completely disable the WordPress admin dashboard during certain hours or time periods, this basic setting allows you to do so. Nothing crazy here, just a feature.
Wrapping Up
I believe that covers the iThemes Security plugin installation and configuration pretty well, and should definitely get you started. I didn’t cover the settings available in the pro version because the vast majority of users will not be going that route, but they can be helpful for some and are worth checking out.
Please let us know if you think we’ve missed anything, or if you have questions!

